DIY Realistic Rotten Skull Prop for Halloween, Haunts, Theatre or Short Films
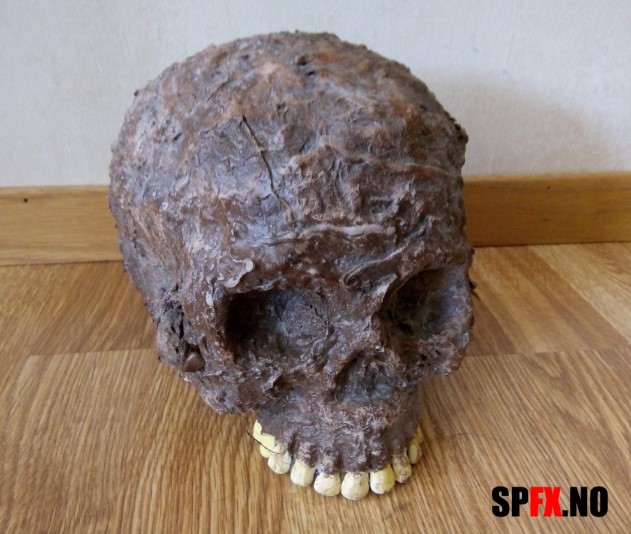
In the tutorial below from the YouTube channel TESTED, makeup artist Frank Ippolito demonstrates how to use paint, liquid latex, cotton, and a fake skull to create a highly realistic, rotting and aged skull that can be used in short films, cosplay, or as Halloween decor. The technique of creating this type of prop is called “corpsing” by makeup effects artists and Halloween haunters.
Supplies for Making a Realistic Rotten Skull
- Fake skull
- Liquid Latex
- Cotton (rolled/sheet form from a medical supply store, or regular cotton balls stretched apart)
- Acrylic paint (browns, reds, blacks, and yellows)
- Chip brush (a smaller detail brush is useful too)
- Popsicle stick (for sculpting and pushing cotton into shapes)
- Paper towels (for wiping and working paint into crevices)
- Plumber’s epoxy (to reposition the jaw)
- Gloves
Step 1: Prep the Skull – Dislocate the Jaw
Before applying any latex or cotton, Frank recommends giving the skull some character right away by repositioning the jaw. A skull with its mouth closed looks static and boring. Using a small amount of plumber’s epoxy, prop the jaw open at a crooked angle – as if the creature was screaming at the moment of death. Use a small cup or wedge to hold the jaw in place while the epoxy sets (about 20 minutes). This one simple step immediately makes your prop more dynamic and story-driven.
Step 2: Apply Latex and Cotton to Build Up “Flesh”
This is the heart of the corpsing technique. The goal is to simulate burned, charred, or rotting tissue clinging to the skull.
How it works: Liquid latex acts like a glue, while cotton provides body and volume. The fibrous, strand-like quality of cotton naturally mimics the look of sinew and muscle – which is exactly what makes it such a long-standing technique in Hollywood makeup effects.
The process:
- Paint a section of the skull with liquid latex using your chip brush.
- Pull off a thin, stretched piece of cotton and press it onto the wet latex. The latex grabs the cotton and holds it in place.
- Brush a thin coat of latex over the top of the cotton to seal it – this creates a “skin” over the surface without building up a thick, slow-drying mass.
- Use a popsicle stick to push and sculpt the cotton into organic, directional shapes. Think about how burned muscle tissue would contract and curl – for example, the lip muscles would have burned and curled inward, and jaw muscles run directionally upward from the chin.
- Work section by section rather than coating the whole skull at once. You can use a hairdryer to speed up drying between sections.
- Bridge gaps (like the open mouth) by stretching a larger piece of cotton across and adhering it with latex on both sides, creating a collapsed flap of tissue effect.
- Don’t worry about saturating every bit of cotton – areas of unsaturated cotton will absorb paint differently, adding natural variety and depth to the final look.
Tip: A basic sense of anatomy helps. Think about where major muscle groups sit on a skull and use that to guide the direction and placement of your cotton. But don’t overthink it – some of the best texture comes from letting the latex and cotton behave naturally.


Step 3: Painting – Browns, Reds, and Blacks
Once the latex and cotton are fully dry, it’s time to paint. Frank uses standard acrylic paints – no airbrush required. The painting happens in layers, always building up gradually rather than applying full-strength color all at once.
Layer 1: Brown Wash (Base/Mummified Look)
Mix brown acrylic paint with a little water to create a thin wash. Brush it all over the skull and cotton, then wipe away the excess with a paper towel. This leaves brown in the recesses and crevices, immediately making the piece look aged and mummified. At this stage alone, you already have a passable mummy skull!
Layer 2: Reds and Yellows (Meat and Muscle)
Apply spotty washes of red across the cotton areas to give a raw, meaty feel – think the look of ribs or a piece of steak. Add touches of yellow to suggest fatty tissue and to help visually separate the fleshy areas from the exposed bone. Keep the red off the teeth and bare bone areas. If you’re unsure about placement, start on the back of the skull where mistakes won’t show.
Layer 3: Dry-Brushed Black (Charred and Burned)
Load a chip brush with black paint, then wipe most of it off before applying. Lightly drag the nearly-dry brush across the high points and surfaces of the cotton. This “charred” effect ties all the previous colors together and gives the skull its final burned, scorched look. The reds peeking through the black give the piece warmth and depth – like embers under ash.
Tip: Always “sneak up” on your colors. Multiple light passes beat one heavy-handed coat. It’s easy to add more paint; it’s hard to take it away.

FAQ: Prop Making
Can this technique of using latex and cotton for “corpsing” be used to create other props?
Absolutely. This technique works on other bones and body parts – Frank has used it to build a full skeleton arm with latex and cotton, sculpted and painted to look like charred muscle. It can even be applied to non-human subjects: prop makers have used this same method to create aged and rotting animals. You can also skip the charred paint scheme and instead apply a bloody red paint job to make the item look fresh and gory rather than burned.
Can I make a rotten skull without Liquid Latex?
If you don’t have access to latex and need the prop done quickly, white glue can work as an alternative binder. However, in Frank’s experience, liquid latex is superior – it’s stickier, more flexible when dry, and produces a much more convincing result. You can find small bottles of liquid latex at Halloween makeup suppliers or costume shops, so you don’t need to buy a full gallon. An 8–16 oz bottle is plenty for a single skull prop. You can read more about liquid latex here.
What type of latex should I use?
There are several kinds of latex: balloon latex, slip-casting (mask) latex, and makeup-grade latex. For this type of prop work, Frank recommends a makeup-grade latex with low ammonia content, as ammonia can be a skin irritant. Look for brands like Kryolan at makeup supply stores or Halloween specialty shops.
What if I don’t have rolled cotton?
Regular cotton balls work perfectly well – just stretch them apart to get thin, fibrous sheets before applying. Alternatively, tissue paper or plain Kleenex (without printed patterns) can mimic the look of charred skin, though it won’t give you the same sinewy, fibrous texture that cotton produces.
The video tutorial is made by TESTED – Norman Chan, Will Smith, Joey Fameli, Adam Savage and Jamie Hyneman.
Post written by Sander Skarås Pedersen, SPFX.NO
Photos – By the TESTED-team and Sander Skarås Pedersen.